15
Dec
2018

Sketching is the major work in creating the art. Sketching involved several steps, the first of which was to lay down the main lines of orientation. Most important was the central vertical axis, for this would be the exact center of the painting around which the artist would plan the rest of the composition.
The vertical axis usually marked the center of the main figure, and it was in relation to this line that all the other figures were also positioned. The correct establishment of the vertical and horizontal axes was also important from a religious point of view.
Thangkas being an expression of religious ideals through art, their figures the ideal bodily forms of enlightened beings had to be perfectly oriented in relation to the central axis. Indeed, correctness at this point was crucial since a mistake here would affect the accuracy, and hence the religious value, of the subsequent work.
Before beginning the sketch the immediate task was to determine a true vertical axis. This was followed by the establishment of a horizontal line perpendicular to it, and four outer lines for defining the edges of the rectangular painting area.
Hence at this stage the artist drew a total of eight major lines two diagonals, the vertical, the horizontal and the four outer borders. To preserve their clean, freshly prepared ground a few artists established these lines on the back of the canvas.
Later, when they began to sketch figures on the front, they could hold the canvas up to a source of light and the main horizontal and vertical lines would show through.
The first two of the eight “major lines” were the diagonals lines drawn from one corner of the canvas to its diagonal opposite. These two lines enabled the establishment of the vertical and horizontal, and thus had to precede them.
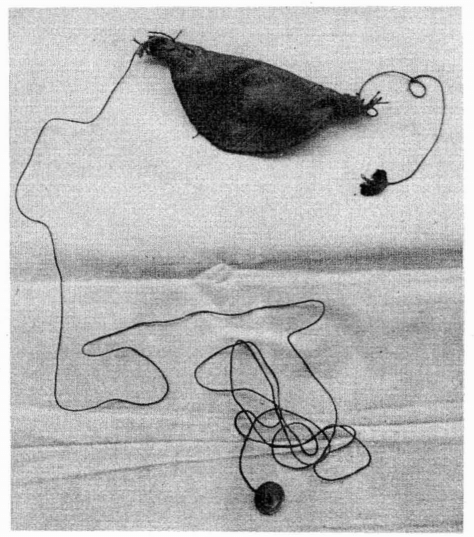
To lay down these lines the artist only needed a chalk line or “marking string” (thig rkud). A simple and serviceable chalk line could be devised by rubbing a length of string with a little pigment powder between the palms of the hands.
The chalk line of most artists, however, was a string that passed through a powder bag (thig rkyat). This bag was commonly made of leather but was sometimes sewn from cloth the marking powder it contained was usually ochre or a mixture of ochre and charcoal.
Moving the bag up and down the string loaded the string with the coloured powder. By positioning and snapping the loaded string the artist could establish a line. Lines thus established with dry powder and string were called “dry lines” (skarn thig), as opposed to “wet lines” that were laid down with a wet marking string.
Wet lines were used mainly in the painting of murals, and they had no application in thangka painting.
When using a chalk line with a stick an artist needed only two hands to hold the string in place and snap it. The string had to be fastened securely to the very end of the stick, so the artist carved a notch in the end of the stick and also a groove around the circumference of the stick near its end.
To fasten the string to the stick the string should be pulled through the notched end, and then wrapped and tied it around the shaft within the groove that had been carved to receive it.
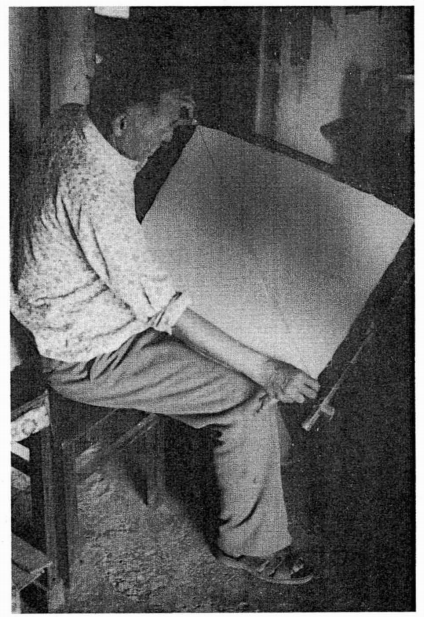
To mark the first diagonal line on the canvas using this type of marking string, the artist must first place the stick end of the string in one corner of the prepared cloth.
With the right hand you should held the stick with its notched end down, positioning the end of the string (and the end of the stick) in the exact corner.
Next, the left hand can be used to stretch the string across the cloth to the diagonally opposed corner, and held it there by pressing down on it with his thumb.
Then hold the end of the stick in place, by clasping the shaft in the palm of the right hand then carefully lower the top end of the stick until you could reach and pluck the string with the index finger of the same hand.
The resulting snap of the string against the canvas released an imprint of coloured powder in a line along the entire length of the taut string. Then the second diagonal can be marked in the same way, and in so doing you can established the central point of the painting area, the intersection of the two lines.
Next you should determined the vertical and horizontal axes. As above, used a marking line, but could also use a compass. There are two main types of compass used in Tibetan art.
The first, which was used for drawing small circles, was similar to the simple metal compass common in the West two wooden or metal pieces connected by a hinge, with one leg sharply pointed and the other having some provision for holding a charcoal crayon.
The second common type of compass described by our informants was the “board compass” (skor pang). This was used by artists from many parts of Tibet for drawing large circles. The board compass was made from two pieces of wood one long slat and a smaller, pointed block.
The pointed piece had a hole in it through which the slat was passed. The point on the small block determined the center of the circle or arc, while the drawing was done with a charcoal pencil fixed in the end of the long thin slat. The charcoal was stationary different radii were achieved by moving the small pointed block up and down the stick.
Once in place, the block was secured by inserting a thin wooden wedge into the hole between the block and the long slat. To establish the vertical axis (tshangs thig), the artist began by determining four points on the diagonal lines that were equidistant from the intersection of the lines. This was done with either a ruler or compass.
The last four of the eight major lines, the outside borders, were easy to establish. The painter first determined points on the diagonals near the corners of the cloth which were equidistant from the intersection of the diagonals, leaving enough cloth on the edge for the later mounting of the painting within a brocade frame.
Then the artist can connect the points with the chalk line to form lines running parallel to the vertical and horizontal. Although some artists first established the diagonals, verticals and horizontals on the back of the canvas, there was no reason not to draw the four borders on the front, since these established the actual area to be painted.
If two compositions were to be executed on the same canvas, the artist had to establish the borders of each composition as well as the vertical axis within each composition.
Once the painting surface had been determined and its. central axis established, the painter began the actual work of sketching. When the painting was a simple and commonplace composition, such as a single Buddha or Tara or the three deities of longevity, an artist might already possess a completed drawing.
In that case no sketch (skya ris) as such would be needed since he could transfer the design to the canvas by other means. But when there is no ready-made drawing or block-print of the required subject had to sketch a new composition.
At this point, if the patron had not been specific about the placement of the main figures, the artist had to decide this himself or herself, either relying on his own knowledge or in consultation with a more learned person.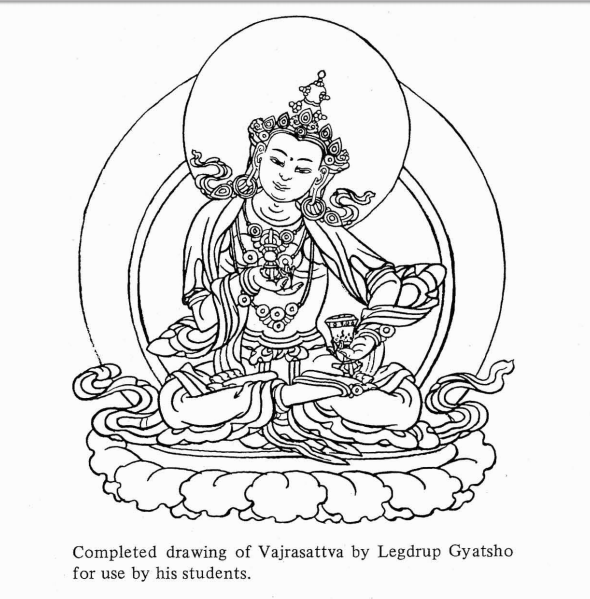
In a complex thangka the artist began the composition following principles that are by now familiar. He first determined the area that the main figure, together with its body nimbus and seat, would occupy in the foreground.
This figure was usually placed in the middle of the painting area, exactly centered on the vertical axis. The exact position of the central figure relative to the horizontal axis, however, was not fixed. It could be placed higher or lower depending on the other elements in the overall composition.
In the case of the simplest thangkas the central figure was the only figure, and to define its area the artist needed merely to draw the figure so that it filled most of the foreground.
Thangkas with more than one figure generally required, as we have seen, the allocation of greater or smaller areas to the various figures depending on the hierarchy of importance within that particular composition.
The artist Wangdrak first divided up his painting surface by drawing larger or smaller egg shaped ovals where the deities were to be located. By describing a large oval in the center astride the vertical axis establish the area of the main figure, including its seat and nimbus or surrounding flames.
Then, to fill in the rest of the area to the best advantage, drew smaller ovals for the lesser figures surrounding the main deity you should arrange the deities of the “retinue” in a symmetrical design centered on the main image.
Finally, after the places of all the deities had been established, it will indicate the horizon and the general layout of the landscape with a few brief lines.
For preliminary sketches a Tibetan painter traditionally used charcoal crayons. A sketch made in charcoal (sol ris) was easy to rub off, and this was both an asset and a drawback mistakes could be easily erased by rubbing the sketch lightly, but any accidental brushing against the canvas with the hand or sleeve would inadvertently erase part of the finished sketch.
To compensate for this, an artist when sketching generally worked from top to bottom, after first sketching the central figure. Some painters when sketching wore a small leather sheath over the little finger of their drawing hand.
In addition to protecting the finger when sketching on rough surfaces, this leather sheath acted as an eraser the artist could brush off any mistakes in the sketch with a few quick flicks of his little finger.
Many Tibetan painters used to make their own charcoal crayons. They mainly used willow (lcang rna) wood, often splitting and whittling down large pieces of it. In areas where willow was scarce, tamarisk (spen rna) twigs were used in its place. Larger sizes were prepared for sketching murals, while thin sticks were best for thangka painting and other detailed applications.
To make the raw sticks into charcoal the artist roasted them in a hot bed of coals in the absence of air. For this some artists first packed the sticks tightly into an almost airtight metal tube (tight packing eliminated much of the potential warping).
The tube, its ends sometimes sealed with clay, was then put into a bed of coals and heated for two hours or more, depending on the heat of the fire. After the correct amount of heating the wood became transformed into light weight charcoal sticks that made a “ting” sound when dropped onto a solid surface. These could be sharpened and used immediately.
Other artists used even simpler techniques for making charcoal crayons. Some merely packed a bundle of willow twigs in clay, and when the clay had dried they placed the mass into a bed of coals. This method is still used in parts of the Nepal Himalayas.
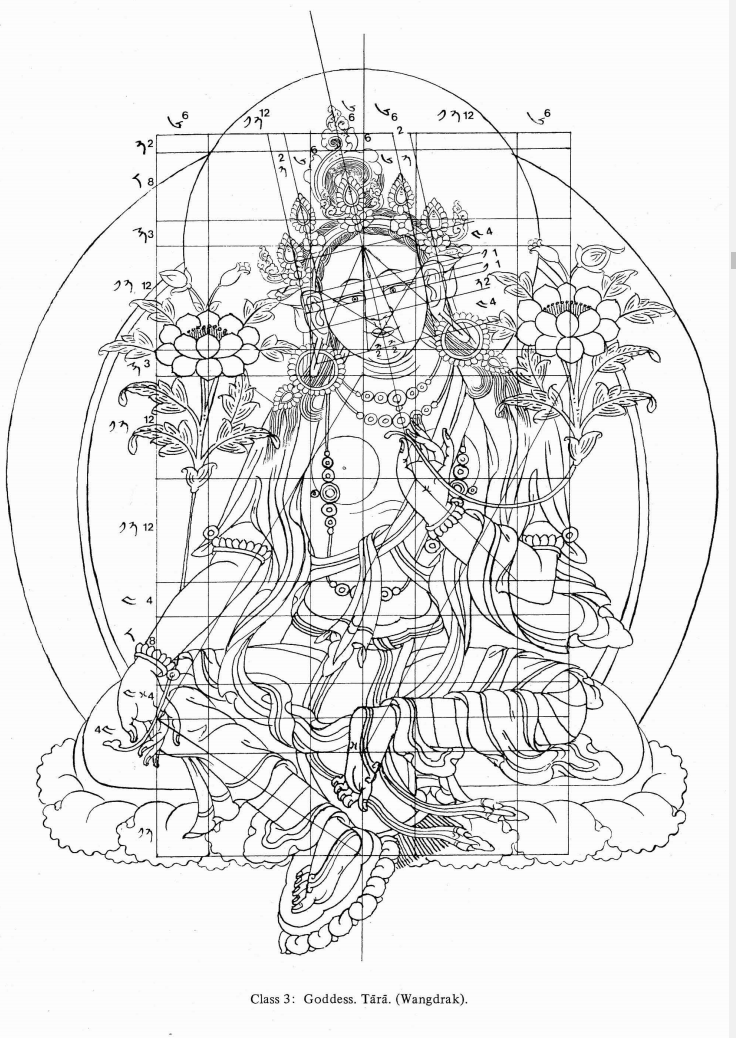
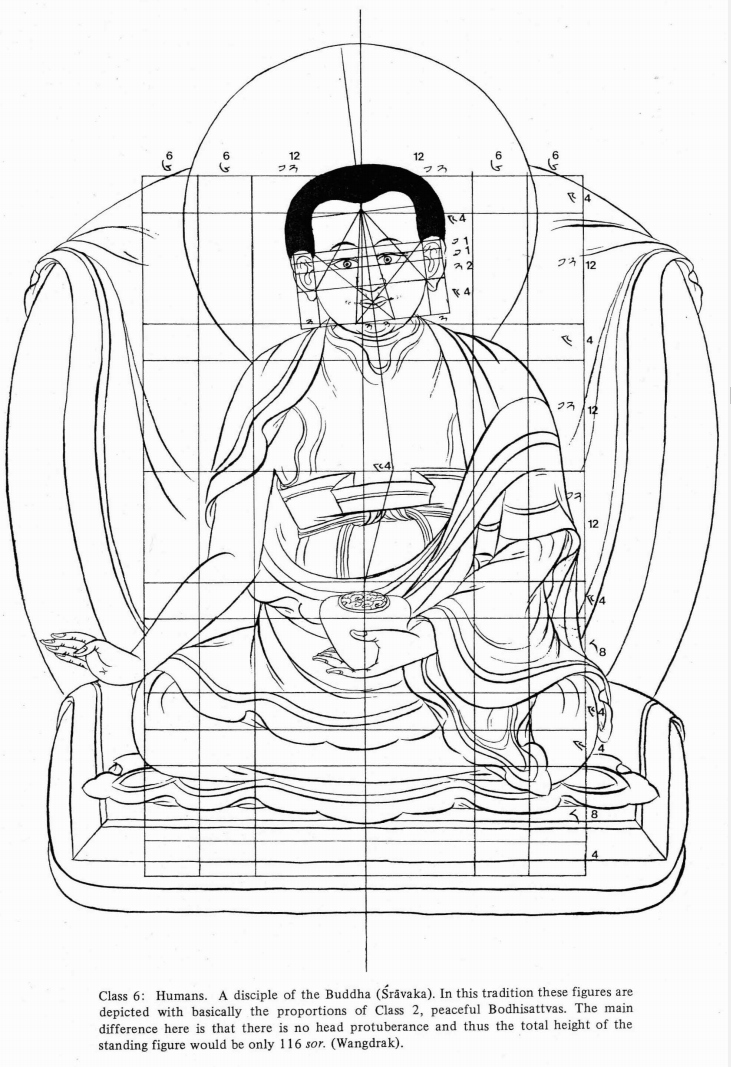
To sketch the figures in a thangka the painter needed an exact knowledge of the measurements and proportions (thig tshad) of each deity as established by Buddhist iconometry and artistic practice. The pantheon of Tibetan Buddhism has literally hundreds of different deities, and no master painter could know all their proportions, configurations and characteristics.
Still, he had to be familiar with the main iconometric classes into which the pantheon was divided, and he had to be able to apply this knowledge correctly to the individual deities that he painted.
An important part of every novice’s training was the time spent under the guidance of a teacher, repeatedly copying examples of Buddhas and bodhisattvas.
When doing so, the student was required first to construct a grid of exactly positioned lines (thig khang), and then to draw within it the sacred figure.
Through the endless repetition of these actions, the proportions and shapes of each major figure became firmly impressed upon his mind so that later you could construct perfectly proportioned figures with only a minimum of guidelines and measures.

Tibetan authorities on sacred art generally divided the deities of the pantheon into less than a dozen iconometric classes. There was, however, no agreement as to the exact number of these. Buston Rinchengrub (1290-1364) and the Eighth Karmapa Mibskyodrdorje (1507-1554) are said to have propounded systems containing eleven main classes.
Phrengkhaba (16th century) and the more recent Mipham rgya mtsho (1846-1912) reduced the number of basic classes in their systems to five, while Klongrdolblama (1719) kept the number to a bare minimum of four.
In the following pages we will describe the basic system of iconometry that our main informants accepted. This system is said to derive from the practice of the great 15th century artist Smanthangpa Smanbla don grub, and it consists of six main classes of proportions, five for deities and one for humans.
The study of iconometry presupposes, to begin with, a knowledge of the terms for units of measure. The same specialized terminology was used by all Tibetan writers on iconometry. In brief, there were two main units of measure small units (cha chung) and large units (cha chen).
Except in one special proportional class there were always twelve small units to every large unit. The relationship between the two was thus the same as inches to feet, but it is important to realize that unlike inches and feet the large and small units had no absolute values.
They were merely used to indicate the proportional relationships within each sacred image, be that image one hundred feet tall or the size of a grain of rice.

The terminology for measures was a little complicated because many synonyms existed for the two main units of measure. Most of the terms are anthropometric in origin.
The larger unit (cha chen) was also called “face measure” (zhal tshad) or “face” (zhal gdong), “span” (mtho, meaning the distance from the end of the extended thumb to the tip of the middle finger), and “palm” (thai mo mthil, the length of the palm and fingers of the hand).
The smaller unit (cha chung or cha phran) was more commonly referred to as a “fingerwidth” (sor mo, or if abbreviated, sor).
One fourth of a sor mo was called a “leg” (rkang pa), and a half of that was termed a “grain” (nas). In addition, Buddhist iconometry sometimes also made use of the cubit (gru mo) as a unit of measure or proportion, and this was the distance from the elbow to the knuckles of a closed fist (equal to two large units).
Probably the most influential treatise written on proportions by a Tibetan was the Sku gzugs kyi cha tshad kyi rab tu byed pa yid bzhin nor bu of Smanthangpa Smanbladongrub (fl. 15th century).
Although the work itself has not been accessible in recent years, it was one of the main sources for two short passages on iconometry by the 18thcentury scholar and painter Zhuchen Tshulkhrimsrinchen. In these passages we find a description of what appears to have been the six major proportional classes (thig chen) of Smanthangpa.
In the first three classes the height of the figure equals the arm span, and the measure of the upper half of the body equals that of the lower half. But in the case of the wrathful figures and humans such balanced proportions are not present to the same extent.
Some other iconographical systems had more “major classes,” due to the subdividing of the above classes and the addition of a few rare types. However, except for a few minor additions or differences, the iconometric system of our Central Tibetan informants was as outlined above.
This first major class included the basic proportions of Buddhas, whether manifest in the world as “emanation bodies” (nirmal akaya) such as Sakyamuni, or in the pure realms as “enjoyment bodies” (sambhogakaya) such as Vairocana and the other Tathagatas of the mandala.
Sometimes the ultimate realization or “Dharma body” (dharmakaya) of the Buddha was also said to be represented in paintings, for instance in the form of Samantabhadra in some Rnyingmapa cycles. The usual representation of the dharmakaya, however, was the stupa.
The latter was considered to be the “mind support” or “mindreceptacle” (thugs rten) of the Buddhas, as opposed to the “speech support” (gsung rten, the scriptures containing the enlightened word) and the “body support” (sku rten, mainly physical depictions of enlightened beings in painted or sculpted form).
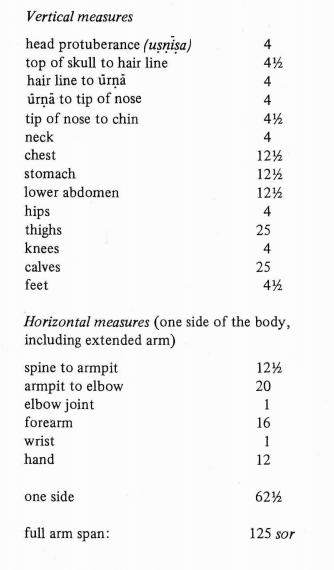
The above measures also establish most of the lines in the iconometric grid that novice artists used as the basis for their sketches. Because some additional lines were needed in the grid, certain iconometric manuals also specified the exact number of lines and the intervals between each pair of lines in the grid.